Document Utilization with Obsidian and Claude Code
This article was written manually.
I’m Oikon. I work as an engineer at a foreign IT company.
AI agent context engineering has been gaining attention recently. I think this trend will continue for a while.
I’ve been experimenting with Obsidian as a knowledge source for providing context to AI agents for about 3 months.
Recently, I’ve finally settled on an operation that feels right to me, so I’d like to share that method.
This article is a detailed version of a recent X post.
Obsidian operation methods vary completely by person, so please read this as “oh, there’s this kind of operation too.”
Operation Flow
First, assume the following are in place:
- Obsidian Desktop
- Obsidian Mobile (Optional)
- Claude Code
Click each to go to their official sites.
First, let me introduce the overall picture of Obsidian operation. The current operation procedure is as follows:
- Share Obsidian Vault across devices
- Save articles with Obsidian Web Clipper
- Keep Obsidian folder structure simple
- Organize Clippings/ with Claude Code
- Connect Claude Code and Obsidian MCP server
- Utilize Obsidian from Claude Code
Let me explain each in detail.
1. Share Obsidian Vault Across Devices
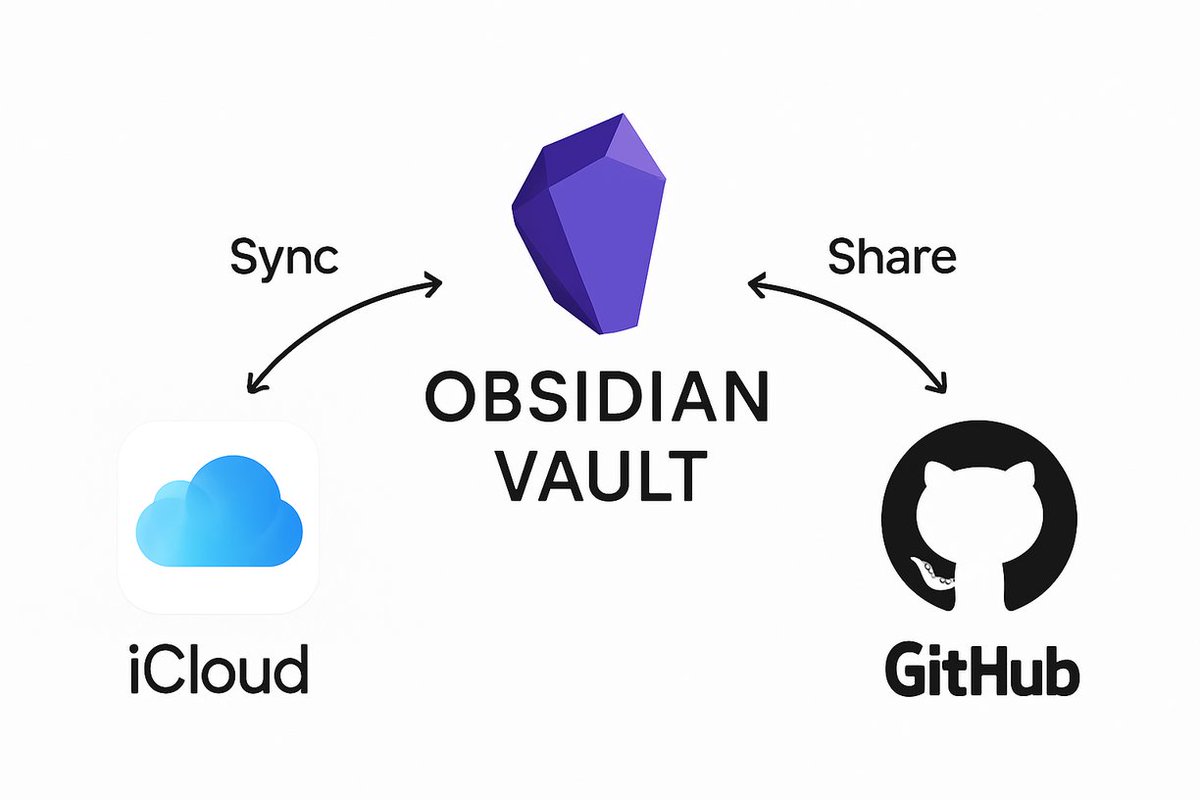
As for where to create the Obsidian Vault (document storage), I create it in iCloud. If you’re logged in with an Apple account, you can share document folders, so you can use Obsidian for free. Those who pay for Obsidian may not need to worry about this.
The iCloud folder also serves as a GitHub repository, so devices not logged into iCloud can clone the repository for the same operation. For example, sharing between Mac and Windows. Making it a GitHub repository also lets you track document change history.
In other words, I use both as follows:
- iCloud: Vault sharing between Apple devices
- GitHub: Vault sharing between devices like Mac and Windows + change history recording
It’s a bit quirky with dual sharing, but personally it works well for me.
2. Save Articles with Obsidian Web Clipper
Use the Obsidian extension Obsidian Web Clipper to save technical articles and documents you want to keep as references to Obsidian.
It can be used on iPhone as well as Chrome, so you can throw documents into Obsidian’s Clippings/ from both PC and smartphone anytime.
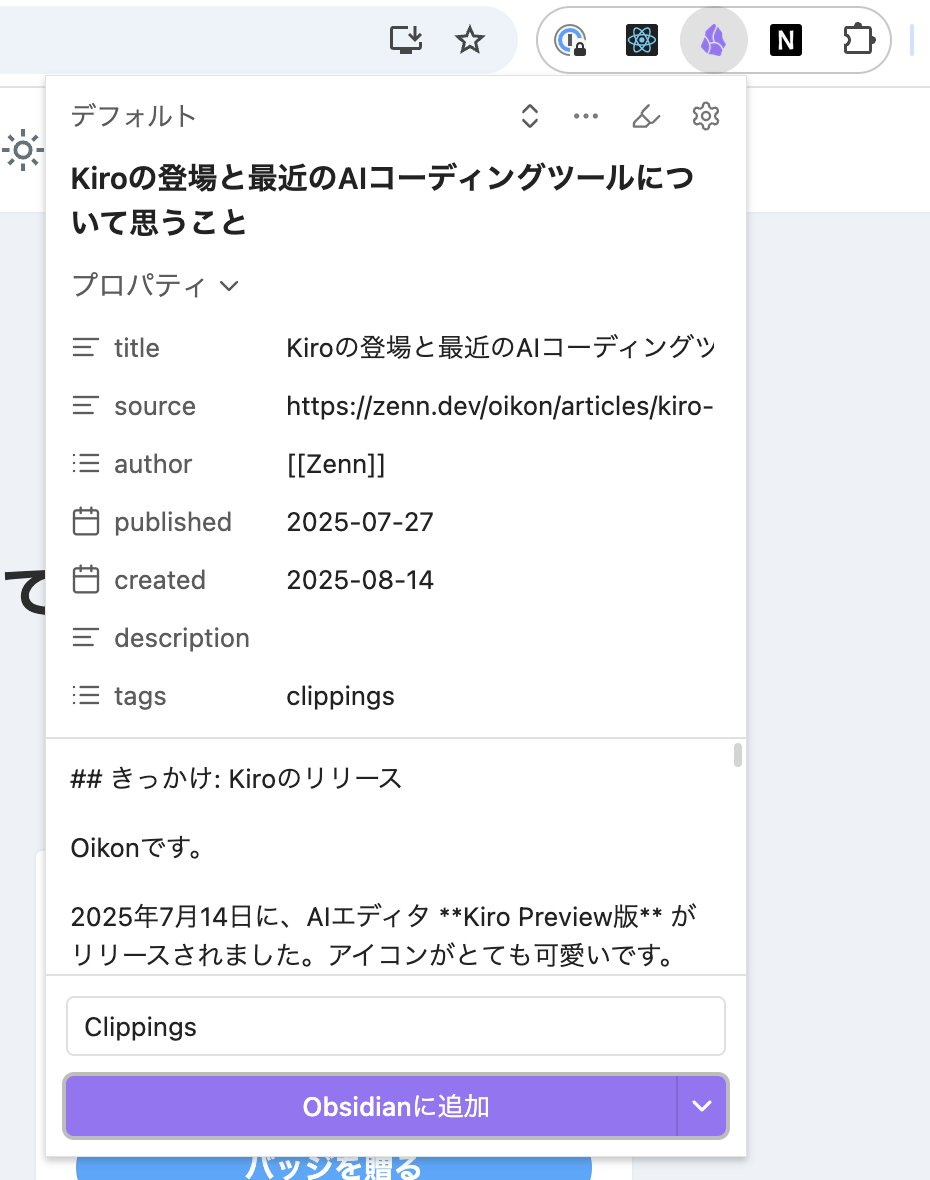
Browser Obsidian Web Clipper
Install the browser extension like Chrome from this link:

After installation, the Obsidian mark appears in Chrome’s extensions. Pressing the Add to Obsidian button adds it to the default Clippings folder.

Mobile Obsidian Web Clipper
A mobile version of Obsidian Web Clipper also exists. Here’s the Apple Store link:

To use Obsidian Web Clipper on iPhone, click the extension on the left side of the URL area.

Documents Where Web Clipper Doesn’t Work
For things where Web Clipper doesn’t work, I give links or threads to ChatGPT or Grok to generate Obsidian-format md files, then save them to Clippings/ as well.
For YouTube videos and such, you can do the same by feeding them to NotebookLM.
3. Keep Obsidian Folder Structure Simple
When researching Obsidian, you almost always see Zettelkasten, but it didn’t suit me.
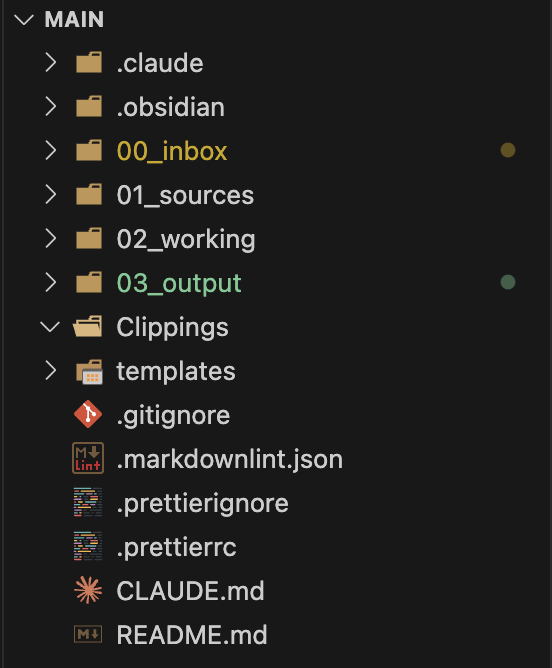
After trying various folder management approaches, I’ve settled on this structure:
00_inbox/: Temporary captures, memos01_sources/: External sources, knowledge storage02_working/: Drafts in progress03_output/: My articles, etc.Clippings/: Obsidian Web Clipper save location
Actual folders: 
Optimal folder structure differs by person, so you need to explore while using it.
4. Organize Clippings/ with Claude Code
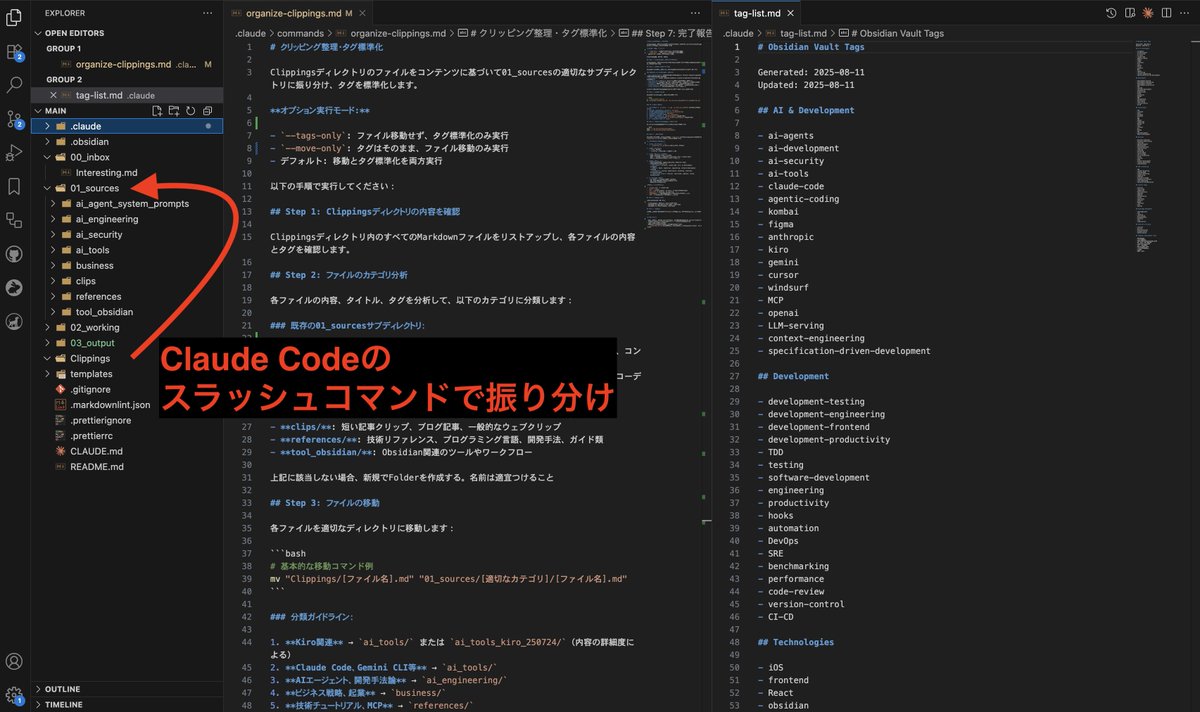
After throwing documents into Clippings/ with Obsidian Web Clipper, I sort and organize them into 01_sources/.
Since doing it manually is tedious, I use Claude Code custom slash commands.
- Check tag-list.md
- Add Obsidian tags
- Sort into folders
- Update tag-list.md
I create a custom Slash Command that executes all these at once. Those who can run servers could monitor Clippings/ and immediately execute tagging and sorting when items are added.
Also, managing existing tags with a dedicated tag document tag-list.md helps prevent Obsidian tags from proliferating endlessly.
Actual custom slash command
# Clipping Organization & Tag Standardization

Sort files from Clippings directory to appropriate subdirectories in 01_sources based on content and standardize tags.

**Optional execution modes:**

- `--tags-only`: Only execute tag standardization without moving files
- `--move-only`: Only move files without changing tags
- Default: Execute both move and tag standardization

Please execute the following steps:

## Step 1: Check Clippings directory contents

List all Markdown files in the Clippings directory and check each file's content and tags.

## Step 2: Analyze file categories

Analyze each file's content, title, and tags to classify into the following categories:

### Existing 01_sources subdirectories:

- **ai_engineering/**: AI engineering, Agentic Software Engineering, context engineering related
- **ai_tools/**: AI coding tools like Claude Code, Kiro, Gemini CLI, Cursor, Windsurf
- **ai_tools_kiro_250724/**: Kiro-specific documents (many already exist)
- **business/**: Business models, marketing, monetization, startup related
- **clips/**: Short article clips, blog posts, general web clips
- **references/**: Technical references, programming languages, development methods, guides
- **tool_obsidian/**: Obsidian-related tools and workflows

If none of the above apply, create a new Folder. Name appropriately.

## Step 3: Move files

Move each file to the appropriate directory:

````bash
# Basic move command example
mv "Clippings/[filename].md" "01_sources/[appropriate category]/[filename].md"
````

## Classification guidelines:

1. **Kiro related** → `ai_tools/` or `ai_tools_kiro_250724/` (depending on detail level)
2. **Claude Code, Gemini CLI, etc.** → `ai_tools/`
3. **AI agents, development methodology** → `ai_engineering/`
4. **Business strategy, entrepreneurship** → `business/`
5. **Technical tutorials, MCP** → `references/`
6. **Web service development** → `web_development/` (create new)
7. **Product cases, failure stories** → `product_development/` (create new)
8. **General clips** → `clips/`

## Step 4: Create new directories as needed

Create under 01_sources if new categories are needed:

````bash
mkdir -p "01_sources/web_development"
mkdir -p "01_sources/product_development"
````

## Step 5: Tag standardization

For each file (moved destination if moved, in Clippings if `--tags-only`), standardize tags based on `.claude/tag-list.md`:

**Detailed tag standardization procedure:**

1. **Reference standard tag list**
   - Check available standard tags from `.claude/tag-list.md`

2. **Analyze existing tags**
   - Check current tags
   - Mark `clippings` tag for deletion

3. **Map to standard tags**
   - Map existing tags to standard tags
   - Convert underscore → hyphen (claude_code → claude-code)
   - Use corresponding items from standard list for Japanese tags

4. **Add new tags**
   - Add 4-6 appropriate standard tags based on content
   - Select from these categories:
     - **AI/Development**: ai-tools, claude-code, kiro, ai-development, ai-agents
     - **Technical**: React, TypeScript, engineering, software-development, frontend
     - **Business**: startup, monetization, marketing, indie-dev, entrepreneurship
     - **Content type**: tutorial, case-study, japanese, review, documentation

5. **Update/organize tags**
   - Update frontmatter tags section
   - Remove duplicates and sort alphabetically
   - Preserve existing useful information

**Important mapping examples:**

- `"claude-code"` → claude-code
- `"kiro"` → kiro
- `"AI"` → ai-development, ai-tools, ai-agents (context dependent)
- `"security"` → security, ai-security
- `"開発効率化"` → 開発効率化 (use Japanese version from standard list)
- `"IDE"` → Replace with specific tool name or delete

## Step 6: Verify organization results

After moving, verify:

- Clippings directory is empty
- Each file is placed in appropriate category
- All file tags are standardized

## Step 7: Completion report

Report number of files moved, distribution to each category, and tag standardization results.

---

**Notes:**

- Directory hierarchy is only 1 level under 01_sources (max depth: 01_sources/category/)
- Quote properly if filenames contain spaces or special characters
- Backup recommended before moving
- Preserve existing useful information, only standardize tags
- If important tags not in `.claude/tag-list.md` are found, consider adding to tag-list
5. Connect Claude Code and Obsidian MCP Server
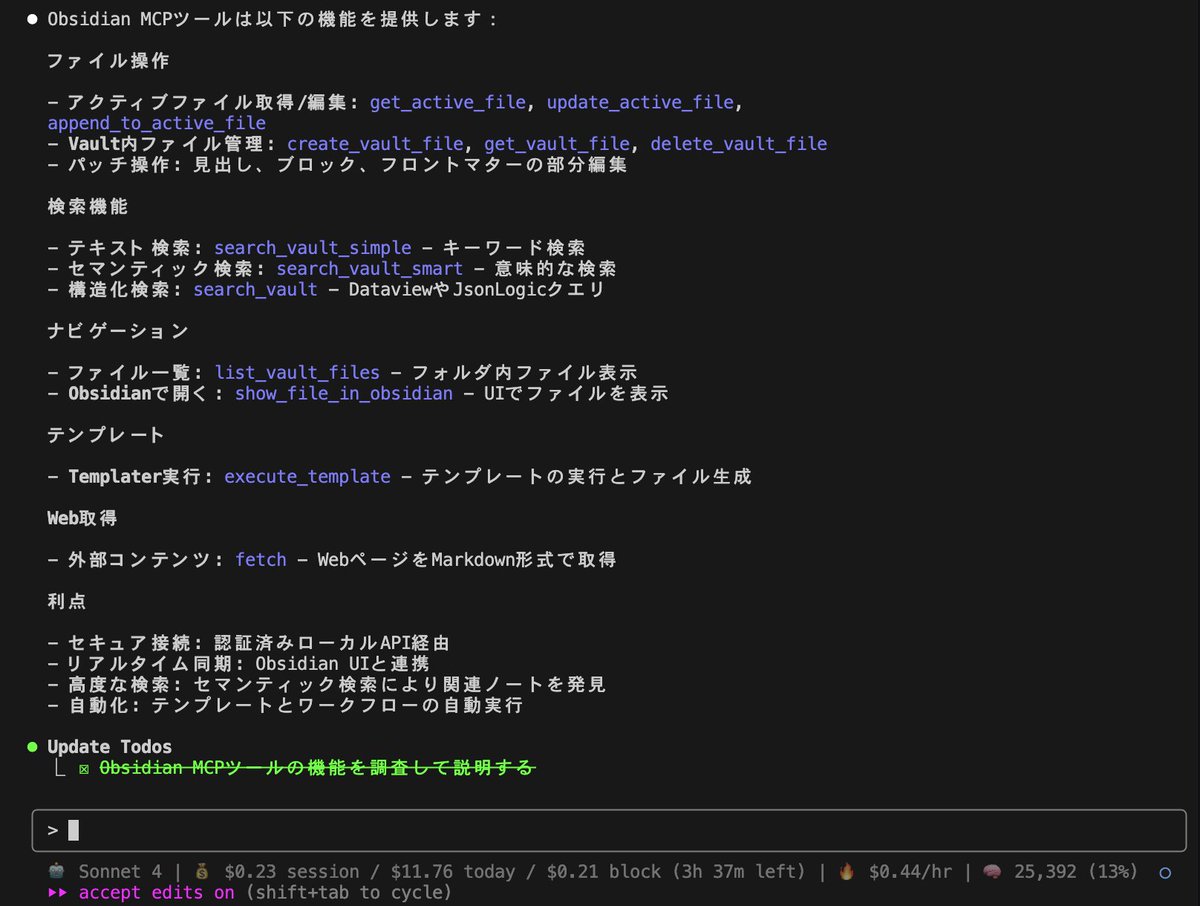
Documents stored in Obsidian are basically utilized via MCP server.
Several Obsidian MCP servers exist, but personally connecting locally from Obsidian Desktop worked best. The reason is the MCP server’s tool set is most usable.
First, install two community plugins in Obsidian Desktop:
- Local REST API
- MCP Tools
These two plugins enable local API (API key) and MCP server functionality.
To connect Claude Code to this Obsidian Desktop MCP server, run this command:
  # Modify "/path/to/vault" to match your environment
  claude mcp add obsidian-mcp-tools -s user -- "/path/to/vault/.obsidian/plugins/mcp-tools/bin/mcp-server" --env OBSIDIAN_API_KEY=YOUR_API_KEY
Or add it yourself to .claude.json:
  {
    "mcpServers": {
      "obsidian-mcp-tools": {
        "command": "/path/to/vault/.obsidian/plugins/mcp-tools/bin/mcp-server",
        "args": [],
        "env": {
          "OBSIDIAN_API_KEY": "YOUR_API_KEY"
        }
      }
    }
  }
If you’ve already connected Claude Desktop and Obsidian with MCP server, you can configure Claude Code with this command:
claude mcp add-from-claude-desktopYou can verify Claude Code and Obsidian MCP server are connected properly with these commands:
Terminal:
claude mcp listYou should see obsidian-mcp-tools: /path/to/.obsidian/plugins/mcp-tools/bin/mcp-server
Claude Code Slash Command:
/mcpYou should see obsidian-mcp-tools ✔ connected · Enter to view details.
6. Utilize Obsidian from Claude Code
Actually utilize documents stored in Obsidian. Obsidian document utilization methods vary greatly by person, but in my case I use them as follows:
Main utilization methods:
- Search documents by tag
- Review technical article content
- Get links for references
- Create content for presentation slides
I provide these as context to AI agents using Obsidian documents. I’ve set up to handle documents from VSCode, and Obsidian Desktop only runs as a server role.
You can run Claude Code using Obsidian’s community plugin Terminal, but personally I preferred manipulating Obsidian folders from VSCode (or Cursor) or utilizing via MCP server.
Obsidian Operation Flow Summary
Summarizing the flow so far:
- Share Obsidian Vault across devices
- Save articles with Obsidian Web Clipper
- Keep Obsidian folder structure simple
- Organize Clippings/ with Claude Code
- Connect Claude Code and Obsidian MCP server
- Utilize Obsidian from Claude Code
Summary
It took about 3 months until I felt Obsidian was useful.
Personal tips for Obsidian utilization:
- Throw things in casually
- Let AI handle editing
- Let AI handle organization
- Let AI handle explanations
- Let AI handle citations
- Humans only handle the final output with references
Obsidian is often abandoned due to its high flexibility, but I think keeping AI-First in mind helps utilize it well.
Going forward, opportunities to use personal thoughts and knowledge documents as assets for generative AI will only increase, so document management—not just Obsidian—will become important.
I hope this article is helpful.
Follow Me on 𝕏!
I also share information on 𝕏, so I’d appreciate it if you followed me!

References